Spring 2017
Weekly Schedule is subject to change on a weekly basis so please check the schedule regularly.
Note: Schedule is tentative
********All CLASS READINGS WILL BE POSTED IN RESOURCE FOLDER ON Webpage*********
Week1
Introduction to class and each other plus Syllabus explanation and ELLO.co account creation
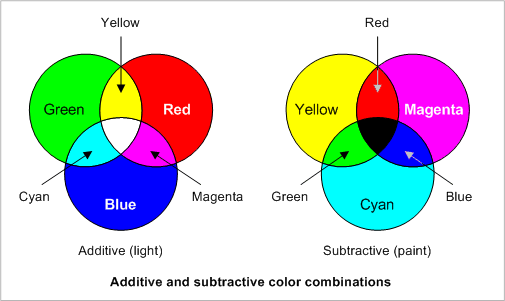
Basics of color RGB CMYK
Projected and reflected light color systems
Intro to Photoshop and first assignment
Understanding tool functions, Layers area, Navigator
How layers affect each other. Creating backgrounds and using masks
In-Class Exercise #1
Take a picture of yourself with either the iMac built in camera or your phone camera. Open the image in Photoshop. Adjust the hue and saturation of the image. Use the mask tool to create a mask that can remove the background around yourself. You will want to only see yourself and not the things that were behind you.
Questions and answers to Photoshop project 1 questions
HOMEWORK:
Due by the start of next class
Document a Central Floridian outdoor event. This event can be a canoe outing on Lake Wauberg, a visit to a park such as Ichetucknee Springs, the Waldo Flea Market, a dirt track race at Bubba’s Speedway.
Using Photoshop:
Balance the color of your outdoor event images.
Choose one of the images to use as a new background for the file that you were working on in class.
Create a text layer that describes the image (this can be one word).
Rasterize the text.
Save the file as a .jpg and post the image to ELLO before the start of our next class.
Week 2:
Toolbar experimentation, image resizing, adding layer adjustments, background eraser tool
TV tutorial
How to add drop shadow
Exercise: create an image with a foreground, background and slogan with shadow or echo. This can mimic a magazine ad as will be explained in class.
HOMEWORK:
Due by the start of next class
Take a picture of a display device. This can be a smart phone, a television, a framed picture.
Also take a picture of something that you really like.
Remembering our in-class exercise, place the thing that you really like inside of your chosen display device
Make the new image look convincing using shadows and adjusting brightness/contrast.
Week 3:
Displacement mapping tutorial: download "white-flag" from the resources section of our website.
Scanning exercise: break into groups and use scanners available in Circa lab as well as in the classroom to scan objects that you either have on you or that you can acquire outside of class. You can use these scans in your Project 1.
HOMEWORK:
Due by the start of next class
Take several images of object that have texture ie: walls, trees, clothing, floors, banners.
Using the Displacement map command, superimpose parts of your in-class scanned objects onto the surfaces of these new textured objects
Make this look convincing.
Week 4:
HOMEWORK:
Due by the start of next class
Research a Digital/New Media Artist.
Choose one of the artists' works and write a paragraph about how the work was made, its concept and its history.
This will be turned in as an ELLO post with the paragraph as the image's description.
Week 5:
Critique of Project 1
Project is due at the start of class. Each student will conduct a short presentation of their project.
Week 6:
Introduction to Illustrator.
Exploring Adobe Illustrator.
Working with pen tools
Create different shapes and line
Drawing the object with pen tools and brush
Filling the color
Gradient
Swatches
Introducing the stroke
Zoom in zoom out hand tools
Using the rotate and reflect tool
exercise: creating a mandala
Using rotate and reflect, create a mandala which represents you. Pick 4 or more shapes to rotate and experiment with color.
HOMEWORK:
Due by the start of next class
Using the rotate tool, create a mandala using at least 6 shapes.
The mandala should follow the theme of Spring.
Week 7:
Working with the art board and changing the size of the art board
Introducing the layer in Illustrator
Alignment
Pathfinder and shape builder for trim and combine the images
Opening the Swatches library
Opening the brush library
Revisiting pen tools
Type tools
Exercise in class: take selfie and make it as a cartoon face
Exercise for home: make a visit card with your own logo or logotype
Due by the start of next class
Create a business card (3.5" x 2") utilizing the tools that were covered in class. Save as an .ai file
Week 8:
Talking about image trace
Showing the various tracing
Showing the difference between good and bad quality or monochrome images image for tracing
Showing the Obama Hope as an example for tracing
Exercise: tracing some images and make a some illustration
Week 9:
SPRING BREAK
Week 10:
Critique day
Week 11:
Imovie tutorial and introduction to project 3
In class assignment using green screen pack
Week 12:
In class work day finalizing video. Final video for Project 3 due before next class meeting. Upload to Youtube and post link on Ello. (Remember to make your movie public when uploading to Youtube)
Week 13:
3D modeling introduction
Week 14:
3D modeling in progress work
Final 3D model to be exported as .STL and submitted via flash drive. Bring your file to class.
Week 15:
Final critique and food celebration presenting both our finished videos as well as 3D models.
